Do Not Need AOL Browser
For Windows 9X/ME :-
Steps-
1) Download an application RASPPPOE available as Zip file so unzip it in a specific folder. Here is the link to Official Website of RASPPPOE.
2) Start >> Settings >> Control Panel

3) Double Click "Network"

4) Click "Add"

5) Select "Protocol" then Click "Add"

6) Click "Have Disk..."

7) Click "Browse...
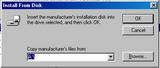
8) Browse through to the folder you unzipped RASPPPOE
".inf"files will appear
Select any of the ".inf"files
Click "OK"
9) Click "OK" again

10) Click "OK" again

11) It will automatically do the set up now.
RESTART the computer
12) After booting the computer
Start >> Settings >> Control Panel
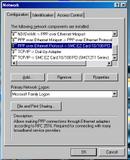
Double Click "Network"
Your Network List will appear

13) On List select "PPP over Ethernet Protocol ->"adapter or NIC associated with your ADSL modem
Click "Properties"
14) In the "General" options of the Properties
Check the box for the option of MTU/Maximum Transfer Unit
Type "1400" for the value of MTU
Click "OK"

15) Start >> Run

16) In the dialogue box
Type "raspppoe"
Click "OK"

17) Set up window with the name of your Network adapter should appear
Click "Query Available Services"

18) A list of available services for your ADSL adapter should appear

19) Click "Create a Dial-up Connection for the selected Adapter"
Click "Exit"
20) A Shortcut will be created
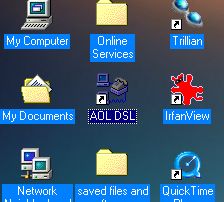
21) Double Click Shortcut
22) Fill in the username and password
Click "Connect"
REMEMBER it is "username@aol.com"

For Windows XP :-
Steps-
1) Click "Start"
then "Control Panel"
2) Click "Network and Internet Connections"

3) Click the icon "Network Connections"

4) Under the menu "Network Tasks" on the left hand side
Click "Create a new connection"

5) Click "Next"

6) Choose the option "Connect to the Internet"
Then Click "Next"

7) Choose the option "Set up my connection manually"
Then Click "Next"

8) Choose the option "Connect using a broadband connection that requires a username and password"
Then Click "Next"

9) Type in the ISP Name - you can type anything to personalise it.
Then Click "Next"
Here's an example

10) Type in your username and password and
Check box for the upper two options
Make sure username = "username"@aol.com
Click "Next"

11) Check the box for "Add a shortcut to this connection to my desktop" for convenience.
Click "Finish"

12) To connect - Just click the shortcut on your desktop
OR Start >> Connect to >> "the ISP Name" you typed in

13) A window like the one below will appear ready for connection.

Steps-
1) Download an application RASPPPOE available as Zip file so unzip it in a specific folder. Here is the link to Official Website of RASPPPOE.
2) Start >> Settings >> Control Panel

3) Double Click "Network"

4) Click "Add"

5) Select "Protocol" then Click "Add"

6) Click "Have Disk..."

7) Click "Browse...

8) Browse through to the folder you unzipped RASPPPOE
".inf"files will appear
Select any of the ".inf"files
Click "OK"
9) Click "OK" again

10) Click "OK" again

11) It will automatically do the set up now.
RESTART the computer
12) After booting the computer
Start >> Settings >> Control Panel
Double Click "Network"
Your Network List will appear

13) On List select "PPP over Ethernet Protocol ->"adapter or NIC associated with your ADSL modem
Click "Properties"

14) In the "General" options of the Properties
Check the box for the option of MTU/Maximum Transfer Unit
Type "1400" for the value of MTU
Click "OK"

15) Start >> Run

16) In the dialogue box
Type "raspppoe"
Click "OK"

17) Set up window with the name of your Network adapter should appear
Click "Query Available Services"

18) A list of available services for your ADSL adapter should appear

19) Click "Create a Dial-up Connection for the selected Adapter"
Click "Exit"
20) A Shortcut will be created

21) Double Click Shortcut
22) Fill in the username and password
Click "Connect"
REMEMBER it is "username@aol.com"

For Windows XP :-
Steps-
1) Click "Start"
then "Control Panel"
2) Click "Network and Internet Connections"

3) Click the icon "Network Connections"

4) Under the menu "Network Tasks" on the left hand side
Click "Create a new connection"

5) Click "Next"

6) Choose the option "Connect to the Internet"
Then Click "Next"

7) Choose the option "Set up my connection manually"
Then Click "Next"

8) Choose the option "Connect using a broadband connection that requires a username and password"
Then Click "Next"

9) Type in the ISP Name - you can type anything to personalise it.
Then Click "Next"
Here's an example

10) Type in your username and password and
Check box for the upper two options
Make sure username = "username"@aol.com
Click "Next"

11) Check the box for "Add a shortcut to this connection to my desktop" for convenience.
Click "Finish"

12) To connect - Just click the shortcut on your desktop
OR Start >> Connect to >> "the ISP Name" you typed in

13) A window like the one below will appear ready for connection.

posted by Lungsi at 12:15 PM
0 comments
![]()
